As you know, I have a two year old son. We haven't started potty training yet, so we always have an empty diaper box lying around. Or is it laying around? Laying and lying always confuses me. But I digress... I've been in desperate need of storage boxes in my craft room, but buying several boxes (about 6) at once just isn't in the budget. Last night I was poking around in Parker's closet and I came across three empty boxes. It was like a light bulb went off! I could make my own boxes! I had a roll of wrapping paper in the guest closet, so I grabbed the boxes and paper locked myself in my craft room for a little "me time" and got to work. It took about 30 minutes from start to finish to make one box. This is a great nap time or bed time project. Or even a "Husband (boyfriend, significant other), you watch the kids, Mama needs a time out!" project!
Supplies needed:
The first thing I did was cut off the flaps of the box with my exacto knife. Then I cut the the two small flaps where the handles are.
Your box will look like this when you're finished:
This next step is highly scientific. It involves unrolling your wrapping paper and placing your box on top. Then cutting. Whew, that's some hard stuff right there! Make sure to leave some overlap. you'll be folding it over your edges. Do this for all four sides.
You'll end up with four (possibly different in size if you're not big on measuring like me) rolls of paper.
Now here's the part where I tell you to do as I say and not as I do. Had I paid closer attention to the back of the label on the adhesive, I would have seen the part that says "do this is a well ventilated area." My craft room is NOT a well ventilated area. By the time I was finished I felt funny. The fumes definitely got to me. I suggest doing these next steps outside. Your lungs will thank you. Plus, the adhesive gets everywhere! Your clothes, body, hair, etc will thank you as well. :)
Following the directions on the back of your can, spray an even coat of adhesive on the side of your box.
Very carefully place your wrapping paper on top of the adhesive and rub out any air pockets or creases.
Continue doing this for the remaining three sides. Then grab your scissors and cut slits along the paper so that it will fold over the edges of the box. You want your sides to look like this:
Grab your exacto knife and cut around the paper where the handle opening is so that you will have something to grab onto when handling your box. I forgot to take a picture of that step, but you can see what I did in the picture above.
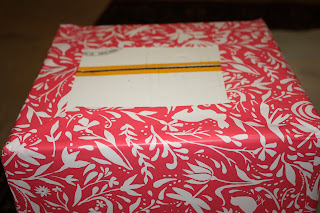
Follow the same steps for the bottom of your box that you did for the top. It should look similar to this when you are finished:
And you're finished!
Or are you? I loved the box the way it was, but felt like something was missing. So I added some ribbon going lengthwise down the box. I think it made a big difference!
I know several of you probably have empty diaper boxes just waiting to be turned into something pretty and useful! It's a good way to reduce waste as well.
Now go make some storage boxes of your own!


This is SUCH a great idea. I have so many of these serving as storage--but they're ugly. This is going to be a new project for when we move.
ReplyDeleteI'm glad you like it!
ReplyDeleteI do this at Christmas time for my holiday wrapping supplies! I also have some in my linen closet for organzier but i used some pretty contact paper so i skipped the spray adhesive!
ReplyDeleteso beautiful!!!
ReplyDelete